> ## Documentation Index
> Fetch the complete documentation index at: https://docs.yumiproxy.com/llms.txt
> Use this file to discover all available pages before exploring further.
# Proxy Helper
**Before integrating a proxy into Proxy Helper, ensure that the proxy service has been correctly configured and is functioning properly.**
**Tip**: Before using the plugin, add your local IP address to the IP whitelist.
The specific steps are as follows:
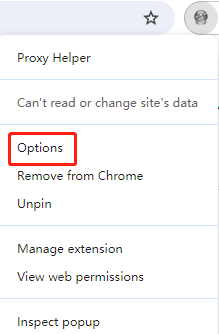
1. Right-click the Proxy Helper icon and select **Options**.
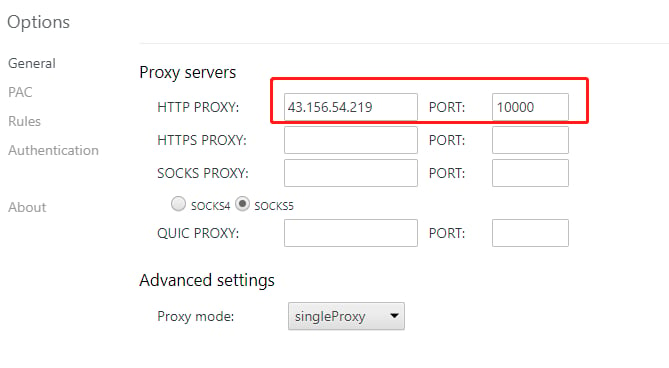
 2. In the configuration window that opens, enter the host and port for the HTTP proxy obtained via the API.
 3. Click the Proxy Helper icon and select the configured HTTP proxy from the list.
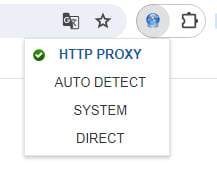 4. Upon successful configuration, the Proxy Helper icon will light up; if it does not light up, the configuration has not taken effect and you will need to repeat the above steps.
By following the above steps, you will successfully complete the integration of Proxy Helper with the proxy, providing a more secure and flexible option for your network connection.
**If you have any questions or suggestions while using our service, please don’t hesitate to reach out. We’d love to hear your feedback and are always happy to help.**
4. Upon successful configuration, the Proxy Helper icon will light up; if it does not light up, the configuration has not taken effect and you will need to repeat the above steps.
By following the above steps, you will successfully complete the integration of Proxy Helper with the proxy, providing a more secure and flexible option for your network connection.
**If you have any questions or suggestions while using our service, please don’t hesitate to reach out. We’d love to hear your feedback and are always happy to help.**